Introduction
Although Forms for Confluence is quite powerful in its functionality, it similarly has a bit of a learning curve for new users trying to set it up. We were looking to simplify the setup process and get the user up and running in just a few clicks. The solution we came up with was to use Confluence Blueprints. Blueprints is a user friendly way of making use of templating.
This blog will show a few key steps that need to be taken to get a Confluence blueprint up and running. Examples will be used from our implementation.
Specifying resources
We need to specify a few resources in the atlassian-plugin.xml file associated with the plugin.
Content template
Here we specify the class that is responsible for some back-end processing, which responds to the user selection by returning the updated BlueprintContext object containing the relevant rendered template.
Note: Some i18n naming has been removed and some lines of code have been moved to improve readability within the constraints of the blog size.
<content-template key="basic-form-template" template-title-key="Basic Blueprint">
    <resource name="template" type="download"
              location="templates/forms/blueprints/blueprint-template.xml"/>

    <context-provider
        class="com.adaptavist.confluence.forms.view.blueprint.BlueprintContextProvider"/>

</content-template>
Blueprint
Specifies the blueprint and binds it to the Confluence Create dialog. We include the dialog-wizard tag because we would like to use our own wizard.
<blueprint key="forms-blueprint" content-template-key="basic-form-template" index-key="forms">

    <dialog-wizard key="formsblueprint-wizard">

        <dialog-page id="blueprintSelectionWizardPage1"

                     template-key="Forms.Blueprints.blueprintSelectionWizardPage1"

                     title-key="Selection"/>


        <dialog-page id="inputTitleWizardPage2"
                     template-key="Forms.Blueprints.inputTitleWizardPage2"

                     title-key="Configuration"/>

    </dialog-wizard>

</blueprint>
Web-item
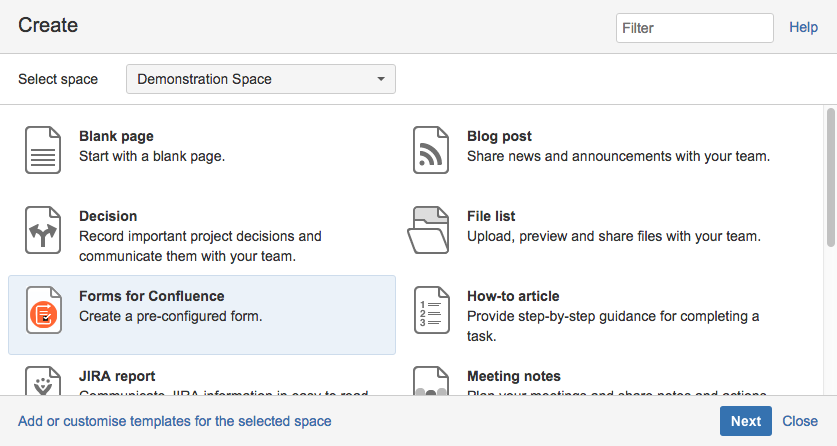
This entry is responsible for creating a clickable link/icon inside the Confluence Create dialog. We also include the condition tag because we only want to show the blueprint option under certain conditions, more on this later.
<web-item key="create-forms-blueprint" name="Forms for Confluence"
          section="system.create.dialog/content">
    <description key="Create a pre-configured form"/>
    <resource name="icon" type="download"
              location="resources/images/blueprint/blueprint-icon-generic.png"/>
    <param name="blueprintKey" value="forms-blueprint"/>
    <condition
        class="com.adaptavist.confluence.forms.controller.conditions.BlueprintShowCondition">
        <param name="permission">admin</param>
    </condition>
</web-item>
Web-resources
Lastly we need to specify the resources we need for the wizard. This will include the .soy templates for each page of the wizard, javascript file and CSS file.
<web-resource key="form-wizard-resources" name="forms wizard Web Resources">

    <dependency>confluence.web.resources:ajs</dependency>

    <transformation extension="js">

        <transformer key="jsI18n"/>

    </transformation>

    <transformation extension="soy">

        <transformer key="soyTransformer">

            <functions>com.atlassian.confluence.plugins.soy:soy-core-functions</functions>

        </transformer>

    </transformation>

    <resource type="download" name="selectFormBlueprintWizardPage1.soy.js"

              location="templates/forms/blueprints/selectFormBlueprintWizardPage1.soy"/>

    <resource type="download" name="inputTitleWizardPage2.soy.js"

              location="templates/forms/blueprints/inputTitleWizardPage2.soy"/>

    <resource type="download" name="wizardPages.js" location="js/forms/blueprint/wizardPages.js"/>

    <resource type="download" name="blueprint.css"
 location="css/blueprint/blueprint.css"/>

    <resource type="download" name="blueprint-images/" location="resources/images/blueprint/"/>

    <context>formsblueprint</context>

    <context>atl.general</context>

</web-resource>
Show blueprint condition
Because this blueprint allows the creation of forms there are some restrictions involved. We do not want to show the blueprint option for users who do not have permission. So we need some mechanism for determining the users admin privileges. Confluence provides a Condition interface which we implement in our class, which simply checks the users permissions and then returns true or false. This in turn shows or hides the blueprint web item.
public class BlueprintShowCondition implements Condition
{


    private static final String SPACE = "space";

    private static PermissionManager permissionManager;

    private static SpacePermissionManager spacePermissionManager;


    private BlueprintShowCondition(PermissionManager permissionManager,
            SpacePermissionManager spacePermissionManager) {

    this.permissionManager = permissionManager;

    this.spacePermissionManager = spacePermissionManager;

    }


    @Override

    public boolean shouldDisplay(Map<String, Object> context) {

        ConfluenceUser confluenceUser = (ConfluenceUser) context.get("user");


        if (confluenceUser == null) {
            return false;

        } else if (permissionManager.isConfluenceAdministrator(confluenceUser) ||

                spacePermissionManager.hasPermission(SpacePermission.ADMINISTER_SPACE_PERMISSION,
                (Space) context.get(SPACE), confluenceUser)) {

            return true;

        } else {

            return false;

        }
    }

}
Wizard
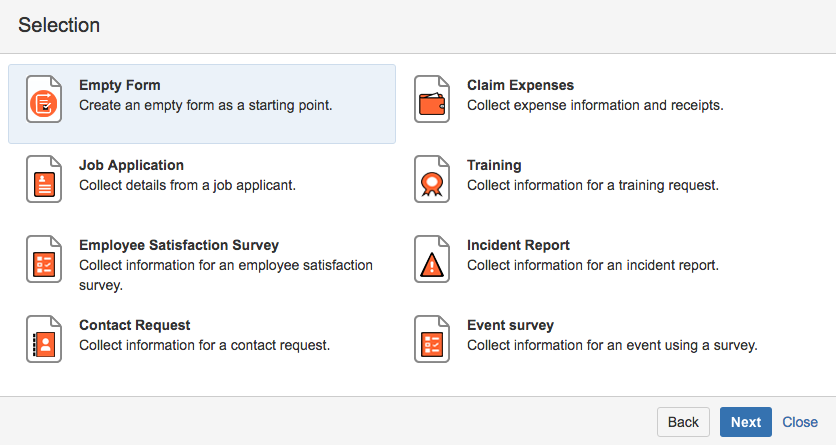
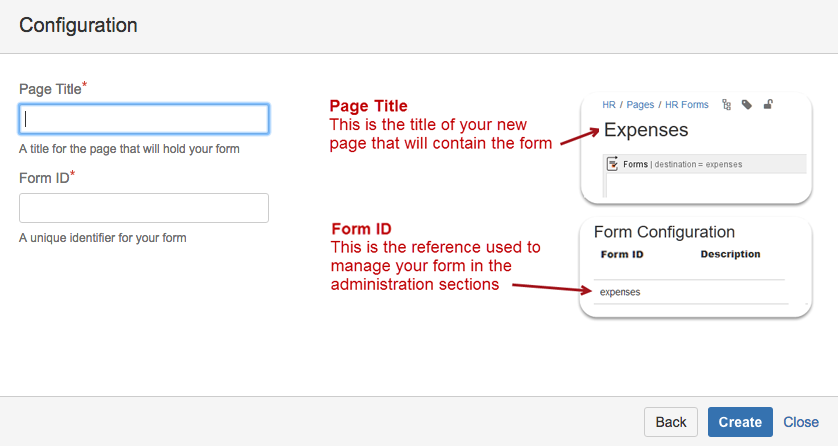
The wizard is just a few dialog pages which the user can step through easily that provides us with some input with regards to creating the template. In this case we use the first dialog page of the wizard to present the user with several templates to choose from. On the second dialog page we require a page title and form ID. We also provide some feedback and visual aid to the user with regards to the required input fields.
Good to know is that the wizard can be extended with more steps and a progress tracker for complex templates. This however is outside of the scope of this writing. Have a look at the Confluence AUI Tracker for more info.
To render the dialog pages we use soy templates. The following is an example of the second dialog page. The rendered pages can be seen at the bottom of this section.
{namespace Forms.Blueprints}
/**
*Page 2: On this page the user specifies the page name and the unique form id to be created.
*/
{template .inputTitleWizardPage2}
<div class="aui-group">
<div class="aui-item wizard-page-two-left">
<form name="wizard-page-two" action="#" method="post" class="aui top-label">
<fieldset>
<div class="field-group">
<label id="page-title-label" for="page-title">
Page Title
<span class="aui-icon icon-required">required</span>
</label>
<input class="text" type="text" id="page-title" name="title" title="title">
<div class="error" id="page-title-error"></div>
<div class="description">
A title for the page that will hold your form
</div>
</div>
<div class="field-group">
<label id="form-id-label" for="formId">
Form ID
<span class="aui-icon icon-required">required</span>
</label>
<input class="text" type="text" id="formId" name="formId">
<div class="error" id="form-id-error"></div>
<div class="description">
A unique identifier for your form
</div>
</div>
</fieldset>
</form>
</div>
<div class="aui-item">
<div class="form-configuration-picture title">
</div>
</div>
</div>
{/template}
We also need some javascript to handle validation and user input as the user steps through the wizard pages. Confluence provides some structure on how to achieve this. Start by looking at the bottom on the javascript file for the function that sets the wizard. For some specific user actions related to the wizard, we can specify a function that implements some behaviour we want. Follow the link JS API for blueprint wizard for more info.
AJS.toInit(function ($) {
    var selectedBlueprintId;

    function handleWizardPage1(e, state) {
        selectedBlueprintId = state.$container.find('.selected')[0].id;
        state.nextPageId = 'inputTitleWizardPage2';
    }

    function handleWizardPage2(e, state) {
        var success = true;

        //add the selected blueprint to the wizard data.
        state.pageData.userSelectedBlueprint = selectedBlueprintId;
        var formId = state.pageData.formId;
        var pageTitle = state.pageData.title;
        var formIdErrorField = state.$container.find('#form-id-error');
        var pageTitleErrorField = state.$container.find('#page-title-error');

        //validate and highlight fields
        if (!pageTitle) {
            pageTitleErrorField.html(AJS.I18n.getText
            ("com.adaptavist.confluence.forms.blueprint.validation.page.title"));
            $('#page-title').focus();
            success = false;
        }

        if (!formId) {
            formIdErrorField.html(AJS.I18n.getText
            ("com.adaptavist.confluence.forms.blueprint.validation.form.id"));
            $('#formId').focus();
            success = false;
        }

        if ((!pageTitle) && (!formId)) {
            $('#page-title').focus();
        }

        if (success === false) {
            return success;
        }

        $.ajax({
            type: 'GET',
            async: false,
            url: Confluence.getContextPath() + '/rest/formservice/1.0/configs/formmail/name/'
                 + formId + '?' + "spaceKey=" + AJS.params.spaceKey,
            dataType: 'json'
        }).success(function (json) {
            formIdErrorField.html(AJS.I18n.getText
            ("com.adaptavist.confluence.forms.blueprint.validation.form.id.exist.error"));
            $('#formId').focus();
            success = false;
        }).fail(function (json) {
            success = true;
        });
        return success;
    }

    function handleWizardPage1Input(e, state) {
        var expensesBlueprint = $('#blueprint-expenses');
        var jobAppBlueprint = $('#blueprint-job-application');
        var trainingBlueprint = $('#blueprint-training');
        var employeeSurveyBlueprint = $('#blueprint-employee-satisfaction-survey');
        var incidentBlueprint = $('#blueprint-incident-report');
        var contactBlueprint = $('#blueprint-contact-form');
        var genericBlueprint = $('#blueprint-generic-form');
        var eventSurveyBlueprint = $('#blueprint-event-survey');

        var blueprints = [expensesBlueprint, jobAppBlueprint, trainingBlueprint,
            employeeSurveyBlueprint, incidentBlueprint, contactBlueprint, genericBlueprint,
            eventSurveyBlueprint];

        genericBlueprint.addClass('selected');

        //on each user blueprint selection unselect other bluerprints and select the current one
        blueprints.forEach(function (blueprint) {
            blueprint.on('click', function (event) {
                unselectOtherBlueprints(blueprints, blueprint);
                blueprint.addClass('selected');
            });
        });
    }

    function handleWizardPage2Input(e, state) {
        var formIdInputField = state.$container.find('#formId');
        var pageTitleInputField = state.$container.find('#page-title');

        //clear input field on change
        formIdInputField.on('change', function (event) {
            $('#form-id-error').html('');
        });

        pageTitleInputField.on('change', function (event) {
            $('#page-title-error').html('');
        });
    }

    function unselectOtherBlueprints(blueprints, blueprint) {
        var blueprintsAmount = blueprints.length;
        for (var i = 0; i < blueprintsAmount; i++) {
            if (!(blueprints[i] === blueprint)) {
                if (blueprints[i].hasClass('selected')) {
                    blueprints[i].toggleClass('selected');
                }
            }
        }
    }

    Confluence.Blueprint.setWizard
    ('com.adaptavist.confluence.formMailNG:create-forms-blueprint', function (wizard) {
        wizard.on('submit.blueprintSelectionWizardPage1', handleWizardPage1);
        wizard.on('submit.inputTitleWizardPage2', handleWizardPage2);
        wizard.on('post-render.blueprintSelectionWizardPage1', handleWizardPage1Input);
        wizard.on('post-render.inputTitleWizardPage2', handleWizardPage2Input);
    });
});
Confluence create page dialog
Blueprint wizard step one
Blueprint wizard step two
Context provider
Once the user finishes with the wizard by clicking the create button on page two of the wizard, then we get a chance to do some processing. We do this by extending the AbstractBlueprintContextProvider class and implementing the updateBlueprintContext method in our newly created class.
At this point we create the form ID with the input from the user and provide the velocity template corresponding to the users selection. This template will be updated with the title the user provided. The templates are saved in .vm files which we retrieved and render as required. The rendered template is added to the BlueprintContextProvider object and returned.
@Override
    protected BlueprintContext updateBlueprintContext(BlueprintContext blueprintContext) {

        createFormId(blueprintContext);

        final String templatePath =
            (getTemplateLocation((String) blueprintContext.get(CONFIGURATION_OPTION)));

        VelocityContextBuilder velocityContextBuilder = contextBuilder();

        for (String key : blueprintContext.getMap().keySet()) {
            final Object o = blueprintContext.get(key);
            velocityContextBuilder.put(key, o);
        }

        final String context =
            VelocityUtils.getRenderedTemplate(templatePath, velocityContextBuilder.build());
        blueprintContext.put(CONTEXT, context);
        return blueprintContext;
    }
Since we will have more than one template to choose from, we need to provide a blueprint-template.xml placeholder.
<at:declarations>

    <at:var at:name='context'/>

</at:declarations>

<at:var at:name='context' at:rawxhtml='true'/>
Conclusion
Making a feature or plugin appealing is a two edged sword. We want to provide complexity and features, yet at the same time we need to balance it against ease of use. There is no silver bullet, but by using blueprints we can abstract away some of the complexity for new users. This feature is not just for new users. Advanced users can also make use of blueprints as this speeds up the creation of a form. The added bonus is that it even helps development by being able to test faster.
- 09 Oct 2018 » A strange bug on AWS Lambda
- 17 Jan 2018 » How to run Karma tests in browsers in Docker
- 07 Dec 2017 » Switching from Javascript to Typescript
- 30 Oct 2017 » Fun with React event handlers
- 17 Jul 2017 » Switching from Groovy to Java
- 24 May 2017 » Useful Git Aliases
- 27 Mar 2017 » Practical Ratpack Promises
- 03 Nov 2016 » Custom Content in Forms for Confluence Connect
- 04 Oct 2016 » Checking user permissions from REST calls
- 30 Sep 2016 » Using the reflection API in Confluence
- 28 Sep 2016 » Creating a custom Confluence Blueprint
- 06 Sep 2016 » ReactJS in Forms for Confluence Connect
- 25 Apr 2016 » Migrating to ES6 in Atlassian Add-ons
- 17 Mar 2016 » All kinds of things I learnt trying to performance test against Fisheye/Crucible
- 24 Dec 2015 » Adaptavist’s Holiday Gift of Atlassian Deployment Automation
- 17 Dec 2015 » Getting a Custom Field value safely
- 07 Dec 2015 » Putting Google Analytics to work with plugins for Confluence
- 02 Dec 2015 » Devoxx Voting, A retrospective
- 25 Nov 2015 » Some things I've learnt about SingleSelect
- 15 Oct 2015 » Using SOY for JIRA actions
- 26 Sep 2015 » Object Reflection in Groovy
- 22 Sep 2015 » Introducing Adaptavist Labs